Friday, July 25, 2008

Home Sweet Home

For those of you who know me, I just recently moved out of my old house into a new town home that I bought a few months back (yes... it took me about 4 months to move in). Why so long? Well I took a long time to decorate the new place and but mostly it was just sheer laziness. Anyways... I've been taking photos of the new place from almost day 1 (I forgot to take pictures of it before we repainted it... just think egg shell white everywhere... eeewww). So anyways, I've been posting the pictures on Picasa Web (http://picasaweb.google.com/pingc315/StoryOfMyHouse) in reverse chronological order. It has been a real interesting experience trying to decorate a whole new place from scratch... trying to decide what the area rug should be like... then matching that with the wall color... then furniture color and style... and finally decorations to put around. Overall, I think it turned out well, granted I spent many many weekends shopping and just planning things.

I'll just call out a few pictures here from the album... all taken last weekend when I was bored.

This is the photo of my dining room with our dinnerware set on display. For the most part, I think I like the composition, I like the touch of green on the left hand side of the frame), adding that green to me adds a quite a bit to the image. I also wanted it to be back lit and just blowout the window completely. With the deep color of the dishes and the bright window, leaving the camera to meter was actually perfectly fine (at first I thought I needed to go - 1/3 EV to compensate for the deep brown of the dishes). This particular shot was actually + 1/3 because I felt I was loosing a bit too much detail in the shadows of the bowl. I wanted to keep the texture of the dishes since thats one of the main reasons why I bought them! The main thing about the composition that I'm not sure about is if the camera should have been higher or lower... this is almost level, but I wanted it to be slightly above so you get a glimpse into the bowl and everything. The other part is just framing it, i.e. how much of the place mat, silverware, the mug, and other dishes to include. This one is my favorite out of the 8 or 9 that I took.

I continued to photograph the table and the dinnerware:

Then I got the idea to play with my strobes (I brought them downstairs intending to set up the umbrella to balance the bright sunlight coming in through the windows). But instead of just setting up umbrella for fill light, I wanted to do something different.


This was one of the earlier attempts. I set the camera's white balance to tungsten, this is what turned natural sunlight blue... it just made everything look... cool (temperature). Well, if everything was blue, it wouldn't look so hot would it? So I slapped on a couple of CTO (color temperature orange) gels on the flash, 1 + 1/4 to be exact. 1 CTO will convert the flash from daylight to tungsten, but I wanted it to be more than just "white", I wanted it even warmer so I slapped on another layer (1/4). For me, this created the nice warm contrast on the bowls from the cool ambient light (and the table). Unfortunately I was still using a reflector umbrella so the light spilled just about everywhere, especially in the foreground. To help compensate for this, I took it off the umbrella and put a long rectangular cardboard box (the box for my flash, the 430 EX ironically) around it as a snoot to confine the light coming from the flash. In reality, I should probably make a real snoot and use some gaffer tape, etc etc, well that or buy one (they really aren't that expensive). For example, the HonlPhoto snoot for $25 ... really pretty cheap. You can get a nice grid spot from there for 25 bucks as well...

So anyways, Here is the shot final shot:


The light is much more restricted on the first dinnerware set (just the bowl to be exact). It does spill onto the bowl in the back but its much better than the umbrella version. One thing I do want to call out is the shadow on the right side of the frame... see how its darker? That is actually after me cropping it... I was using the cheap ebay flash triggers Cactus V2 to fire the flash remotely, apparently it's highest sync speed is only 1/200 secs and I shot at 1/250 sec, the highest sync speed of my flash. So this is what happens when your shutter speed is faster than your sync speed on Canon cameras :). Either way, I'm still totally new to this strobist stuff, just trying to experiment and see what works and what doesn't work. Any comments or critiques welcome.

Just one more picture, this one from the living room.

This is mostly ambient light, though I do have a flash going off maybe 8 feet away camera right on an umbrella. As a friend said, I could have added more fill light so there isn't all the shadow above the fireplace. Maybe instead of having the umbrella, I should have just slapped a diffuser on it and point it straight up. Another thing to try next time is to have hard bare flash coming in to create interesting shadows. Oh well, maybe next time :)

Saturday, July 19, 2008

Catch the rainbow

So the second assignment for the photo club has been due for a couple of days now... I finally have some extra time to stop and blog about it.... The second assignment is titled "Catch the rainbow" and is pretty much as it sounds... take 7 photos, one of each color of the rainbow (red, orange, yellow, green, blue, indigo, violet). Again, no flashes, no post processing etc. I was super excited about this assignment and had thought about a lot of the photos for quite a few days (if not weeks). Here was the rough plan of attack:
  • Red: Originally I thought about a macro shot with extremely shallow DOF on the red 'S' in the RSX Type-S badge, but there would be too much blue so I shifted my attention to the red dashboard lights inside the car...
  • Orange: There is a huge orange street lamp right outside my bedroom window which shines straight across the room to a mirror. I was going to stand in front of the mirror for a pure silhouette shot with orange rim lights everywhere.
  • Yellow: Some shot of my favorite chocolate candy :)
  • Green: Originally I wanted to do maybe a shot of the Xbox's ring of green light as it boots up, but then I wanted to do something more dramatic and borrowed a friend's KG jersey....
  • Blue: The backshot of the police man at the farmers market. (see the farmers market album)
That left me with indigo and violet that I didn't really have any ideas for... But I soon learned that the shot in your mind... won't always match the shot you end up making :).


That's the shot of KG's jersey... I tried very hard to get this shot right... but in the end just couldn't quite get it the way I had imagined.... maybe it was never a good idea... but definitely poor execution. Here is what I wanted... I wanted the jersey standing alone in the dark closet. I wanted to use a wide angle lens to really make the closet seem much larger (and thus emptier). I wanted a single hard light shining on the jersey from above to sort of highlight his name but leave the rest of the room really dark. I was hoping this would make for a dramatic picture and as a homage to a great player.... Unfortunately after hours of trying, I just couldn't quite get it right. The composition just didn't work for me... I couldn't find a good way to compose it and honestly I ended up spending the majority of the time fidgeting with the lights... Keep in mind no flash allowed, so I worked with a desk lamp (boy have I been getting lots of mileage with that thing lately :)). I clamped it to the shelf to camera right but quickly ran into a problem... desk lamps are designed to spread light... but I wanted a focused beam of light or else everything will be equally lit and nothing will be interesting... I ended up grabbing an empty cardboard box (long rectangular one) and shoved it onto the light bulb to better control the light (see that strange shadow on the right side... thats from one of the flaps...). Unfortunately I wasn't using a tripod so I was all contorted with one hand on the cardboard "snoot" and one hand holding the camera... If I spent more time and used a tripod as well as an actual snoot, I probably could have made a better shot... but I think I was just tired of it and gave up. Suggestions on composition improvement desperately needed!

The chocolate shot (Ferror Rocher) Actually worked out much better than I had originally thought.

And set up shot:


So I knew I wanted a white-ish background to make the gold stand out and also to just have a bright "happy" picture. This is a photo of luxurious chocolate candy after all. I started out with a white cardboard that I bought from Target (like 1.99) and placed a small piece of glass on top of it to add some reflection. I just used some glass from a photo frame, nothing fancy. I wanted a really well lit, but still slightly directional light so I started out with the natural back light coming in through the blinds. This adds a bit of color and light to the candies in the back as well as some "rim light" around the candy (ok ok, it looks like its coming from above). I then took a floor lamp (one of those that shines upwards) and placed it on the table shining directly at the candy. The direct light really worked well with the gold foils and lit it up beautifully I thought, this is good. I threw in two mini-reflectors on the right hand side to help lessen the shadows and just brighten it up a bit more. The effect isn't very obvious, but it is definitely brighter than it would be without those 2 mini-reflectors. Note that a crumpled up piece of foil would have worked just as well. Since it had such a mixed lighting, I used a gray card to make sure the white balance is correct and that the gold foil will indeed turn out gold (this is very important to the shot for obvious reasons :)).

In the end, most of the planned shots didn't work. The red shot was pretty much one of the few shots that just came out the way I had imagined. The blue shot lacked the impact I wanted so I tried a second blue shot... which also failed so I ended up having to plan for a third (and 4th) blue shot.... The ornageshot also failed... a silhouette of yourself holding a camera isn't very exciting... I did keep with the orange glow from the light and ended up doing some random self portraits. Anyways, full album available (with commentaries on what I was trying) here, note it also includes shots from assignment 1.

Saturday, July 12, 2008

Street photography

So street photography is one of those things people see all the time, but can have a profound emotional impact (at least I always thought so). It's one of those things that I've never tried, always wanted to, just never really forced myself to do it (I've done a few random candid snap shots of strangers before). To me, street photography is just to sort of sit there (or walk if you prefer) and try to catch candid photos of interesting people mostly strangers, but I guess some people prefer to actually talk to random people, ask for permission and try to build a personal connection - this is all great just... I'm too shy to try it. This is actually way harder than it sounds...
  1. You should probably use a long lens... you don't want to walk up to the person and just start taking pictures (again, unless you are the type that goes and asks for permission...). Since I just got my 1.4x teleconverter, I decided to give it a shot. My equipment ended up being 20D + 70-200 f/2.8 IS + 1.4x TC so effectively I had like 440mm reach... perfect.
  2. Since I didn't ask for permission... that means you probably shouldn't sit there and snap shots of the same person for 5-10 mins... even if you are far away... people tend to notice a giant white lens pointed at you... So I tend to snap 1 or 2 shots before moving on. If I got it, great. If not, oh well. This also meant that you can't sit there and think about composition too much... I usually just shot by instinct and if I think it might be interesting, I take a quick shot and move on.
Since Santa Monica has a farmers market every Wednesdays next to our office, I decided to give it a try there (also to do my photo club assignment). I've walked past it many times and always thought there would be a lot of photo opportunities. There are just a lot of hard working everyday people there, people just trying to make a living, personable people who are more than happy to sell you their fresh produce... the type of people that would greet you warmly as if you are a friend rather than a customer. There is a lot of potential for personal stories at farmers market. Finally, this is Santa Monica... there are always homeless people and they almost always make great photography subjects due to the texture of their face and hair (this really depends on how you feel about photographing them). While I was there, I didn't think I got any usable shots. The colors didn't look right, and the exposure was off by a little bit. Composition was difficult with all the people around you... it just didn't click for me. When I got home and actually looked at the photos, I felt they were too plain. They didn't tell any stories, they didn't evoke any emotions.... they simply recorded reality. About half way through processing the photos, something just... clicked. I was processing a photo of a homeless person with a starbucks cup and decided to deepen the shadows a few notches (which really deepened the background, drown out some details in the shadows) and then bumped up the highlights ever so slightly (this to me seemed to make the subject stand out a little bit more, add more depth to the photo. Because I increased the shadow so much, everything naturally looked a lot more saturated and deeper colors which wasn't natural for a portrait so I decided to drop the saturation a few notches until it looked normal. Then I thought about dropping it even more so the colors look slightly faded out... almost worn and gave the photo a cold grim look to it. This is good since it is the exact type of feeling I wanted to convey for the person. I also noticed he had a very interesting rough beard and hair... his face was also a bit wrinkled and full of texture so I decided to try to bring that out with a layer of sharpen.


The original unaltered image


Deepened the shadow and slight increase in highlight


Desaturated it and washed out the colors


Final crop and sharpen. Also bumped up the brightness slightly


I really liked the resulting effect. It felt dark and gritty. I thought it showed off the toughness of life (and his toughness for surviving, he has that rough look after all) well so I decided to do pretty similar things for a lot of the other photos. The rest of the photos here:


I thought over all I did pretty well... granted most of it was done in post processing (all in Picasa). I am usually not a fan of post processing too much, but in this case I thought it really helped convey the emotion I wanted to capture so I don't mind too much. I just hope it doesn't look like Flickr images :p. In the end, I still don't really like street photography. It just feels weird taking photos of these people I have never met and will never meet again. Maybe next time I'll actually stop someone for a chat, ask for permissions and also just to build a more personal connection.

Wednesday, July 9, 2008

Where do you want to go?

So July 4th weekend just passed, and of course, the most asked question was "where do you want to go?" Whether it's for photos, for fireworks, or just for a day to get away, everyone wants to go somewhere. I wanted to go to the Salton Sea... but my friend thought that would be a bad idea... too hot out there in the desert. Instead, we decided to go to Point Mugu out in Malibu, at least we get the ocean breeze there. But the question I really wanted to ask is... "where do you want to go (in photography)?"... or more precisely, where do I want to go? What is my end goal, both in every picture I take, and as a photographer in general. What do I want my pictures to convey? What kind of photographer do I want to be? Majority of my pictures lack soul... lack the "wow" factor that takes a simple shot and transforms it into something of value, into "art". Maybe it's just because I don't think about what I want to capture most of the time. I sort of walk around haphazardly taking pictures... well ok that's not true. I do stop, and think about what I want to do at a scene, but recently I've been drawing a blank. And even when I do have a shot in mind, my execution usually falls far short (more on this in the coming days). I've heard the best way to improve your (landscape) photography skill is to actually love what you are photographing, you have to have a passion for it or else your photos will come out dead. You have to feel something in order for your image to convey SOME kind of emotion and maybe lately I'm just as dead as my images.

So anyways, the July 4th trip, my family and some friends went out to Malibu for a photo walk hike. We first stopped at Venice for some quick shots of the canals. Noon is the worst time for photography... but sometimes things just don't go the way you planned. Here is a shot straight out of the camera:
This is not a good image by any stretch of imagination. It is poorly composed, the colors are muted and it just looks flat. Here was the original intent.... I wanted to take a photo in portrait orientation to really make the canal feel longer and add more depth to it. In composing the image, I wanted the boat to be the center of focus so I placed it about 1/3 of the way from the bottom of the frame and leave plenty of space above it... unfortunately the space above it is quite boring and even have distracting buildings and power lines. The original intent was to make the boat seem lonely in this huge long canal... just kind of free floating there, barely tied to the docks. Ping... FAIL. At first, I was very tempted to delete the image and move on, it has no redeeming qualities and its not something I'd look at again but then I thought to try something different with it. I gave it a quick focal B&W filter in Picasa so that the entire image will be black and white except the area around the boat. Since the water is pretty colorless around it, it didn't matter if the focal radius wasn't perfect, it still just looked black and white except the boat. This made it better, at least something I'm willing to keep around. The focal B&W really helps you focus in on the boat and stay there without letting your attention wander around. B&W images typically are also moodier and just have a whole new feel to it, but the composition still wasn't good. That's when my friend suggested I crop it a bit, cut out the top to get rid of the distracting lines and also crop a bit off the bottom to keep it balanced and the boat at about 1/3rd of the way. This is the final result:


Is it a good image? Not by a long shot. Is it better than the original? I'd like to think so. The crop helps a lot and makes the boat the intended subject instead of just something there. While I am not a big fan of post processing, I think in this case it really helped me achieve the photo I *wanted* to take but couldn't... in the end, it helped me achieve my goals and convey my intentions. Even so, the photo still lacks feeling.... it is still missing a soul.

The rest of the day didn't go better... the photo walk at Point Mugu turned into a full hike that none of us were really prepared for and the weather wasn't exactly the best for photography... everything was just kind of hazy and colorless. The hill/mountain was mostly dead weeds/grass which certainly didn't help to inspire me. After we got to the top, there was this small field that reminded me of the intro sequence to Gladiator so I decided to try a few portraits...

I figured since I lugged the 70-200 up to the top, I might as well use it right? So I put the 70-200 on, walked far out infront of my friend and had her walk to me as naturally as she possibly could (with a large white lens pointed at her). Lucky for me she is a great model and super easy to work with so I had nothing to worry about. I just had to kneel down so I'm closer to the ground and allow me to capture of of the sky/background behind her and zoom in all the way. I didn't really have time to frame the shot since she was walking already and as easy going as she is... she would probably kill me if I made her do the walk too many times. I just wanted the blurred foreground and background and wasn't particularly picky about anything else. I had to fix up this shot a bit in Picasa (add a bit more contrast - increased shadow, highlight, slight fill) since the original came out very bleached out (It might have been because of my polarizer being on and not properly adjusted). Anyways, this seemed close enough to what I wanted to capture so I'm satisfied (tho I think my friend did most of the heavy lifting for me).

The other picture that I kind of liked from the trip was this shot:

I used Canon's super wide EF-S 10-22 lens for this shot (at 10mm). I wanted the super wide to really make the field seem endless and just make everything a bit more dramatic. Given how hazy the day was, I put on my polarizer to darken the sky and increase saturation. People always say becareful of using a CPL with a super wide lens like the 10-22, you'll get uneven effects (as can be seen with the gradation from deep blue to very light blue sky). I didn't mind, I actually kind of like that effect, especially for this picture. It makes the overall image seem darker and moodier. I think I touched up the shadows ever so slightly in Picasa but the polarizer did most of the work for me. I hope it can convey the vastness of the field... but what kind of emotion does it really evoke? I don't know. In the end, the photo hike was mostly just hiking and less photos... the full album can be found here. I still don't know how to make images with feeling... with passion, with some emotion. In the end, the photos are just some bits representing colors without anything pulling them together to form something bigger, something more meaningful than "oh I was there".

In the end, I pose the same question as I started with... "where do you want to go?"
Where do you want the photos to take your viewers?

Sunday, July 6, 2008

Looking back at AX 2008

It's 4th of July again... and that can only mean one thing... the largest gathering of anime fans, otakus, and photographers in Southern California - Anime Expo. Looking back at AX 2007, I only kept 33 photos, none of them particularly good... just a collection of snapshots of people's costumes. While I certainly hope I've gotten better over the past year, the photos tells a different story. I ended up keeping 60 photos but again, most of them are just passing snapshots of people's costumes. Arguably the majority of the photos from this year's AX was actually WORSE than last years. Crappier composition (i.e. cutting parts off) and screwed up exposures. I thought overall the costumes were more interesting last year, but maybe I went on an off day. Either way, I'm not terribly happy with how I shot this year. Part of the problem is that I'm still just shooting snapshots... "hey can I take a quick picture of you?" and I rely on the cosplayers to pose themselves and I just take a quick photo, thank them and move on. I feel bad for troubling them and sometimes there is just nothing you can do with the background inside the dealer hall. It is so easy to be stuck in that mindset. But I see other photographers (there were some real good ones it seems) actually pulling them aside, posing the cosplayers, adjusting them, etc, taking their time to get a good shot. Perhaps next year I just gotta bite the bullet and force myself into that mindset or just forget about bringing my camera.

Anyways... some photos:

This was one of the earlier photos from the day that I liked. She was by herself and had enough distance from the background for me to blur it out sufficiently. I really like the natural sunlight on the left side of her body. Also I had some fill flash to just make her pop out a bit more. She was probably a professional cosplayer and knew what she was doing... either way, not a great capture, but at least not a terrible one.


Here I am in stalker mode probably about 20-30 ft away taking quick snapshots of Jyukai's Manami at their autograph session. I wasn't sure if I am actually allowed to get close to take photos since I wasn't in the long line for her autograph. I just knelt down, switched to the 100mm macro lens and fired a couple shots using my legs to stablize the camera.


Here are some good kingdom hearts cosplayers. This was after I got out of shooting inside one of the halls and had set the ISO to 1600 and forgot to dial it back down.... So a bunch of the photos were over exposed... this one is particularly noticeable since I completely blew out the windows and most details in the background. But I still kind of light the resulting effect (not something I'd ever try again but...) and how this makes their colorful costumes stand out even more from the basically white background now.


Nel Tu from Bleach. One of the better exposed photos I got. The fill flash here while barely noticeable does help a bit to light up his/her face and costume.


Here I am finally starting to get into it a bit more. After taking a standard snap of these two, I asked for another photo and decided to go low shooting up at them. With a slightly wide angle lens it makes them seem a bit taller and just more powerful (looking down at you). Just sort of commands more respect with their cool won't-take-any-bs look.


I walked past this Rukia on her cell phone (probably talking to Soul Society) and just wanted to try something. I always like those shots of someone's side/back the face is intentionally blurred out and you focus on their hands or something. I liked her gloves so I figured this would be a good opportunity to try. When I first asked she got all confused and stuck her hand out for me to photograph, I said "no no, just keep talking naturally" and she probably thought I was a psycho... but she listened anyways. I swung around beside her and started taking a few photos. I'm not entirely sure how well this turned out, there are things I like about it, but at the same time, its not as cool of an image as I had originally planned (oh it never is...). Next time I try this, I'd probably have to include less of her arm but I do kind of like the over the back/shoulder feel.


I liked this girl, she has done this before and knew exactly what to do. After posing her self she knew to look around at the different photog's thats gathering around her (there were quite a few... at least 2 Canon white L lenses too). I really liked the fact that she knew to make eye contact with each one of her photogs for a few seconds before moving on. I am not sure I like her first pose all that much, the hand angle doesn't look natural. Oh well, like I said, next time I come to AX, I should take a more active approach and be mindful of all the minor details


Someone else was doing a group shot with these two girls and a few other people. I caught the tail end of it but the other people have already left. Since she was still sitting, I asked if I can get another couple of shots in. With her dress laid out so neatly, I knew exactly what I wanted to do... do an almost top-down shot with a wide angle lens to let the distortion work in my favor and make the skirt seem larger than it actually is (exactly like what people do when doing engagement/wedding photos to make the train seem even more dramatic). Since I was probably blocking the view for at least 3 photographers behind me (who were all kneeling down to about eye level with her with a long lens), I took a couple quick snaps and jumped out of everyone's way while apologizing. I can be such an ass sometimes when photographing things... just ignoring the world around me...

This led to my friend commenting "you are so different when taking pictures... all the other guys take a long time before taking a picture but you just go in there, snap snap snap and move on" well... maybe its because I was destroying their composition by standing right in front of their main subject :p... that and if I didn't go snap snap snap and move out the way, I'm sure one of the other photographers was able to jump me and drag me away...

Full album available here. While for the most part the day was a failure for photography, I still had fun and certainly learned a lot. Just because I'm at a trade show or convention, doesn't mean the basic rules of photography doesn't apply. In fact, they are more important ever... one of my favorite photographers Albert (http://www.pbase.com/albertjou/show) takes some great photos at shows... Next year, I'll have to be more active, try to work with the cosplayers and pose them if they don't pose themselves... and most importantly, be mindful of the background...

Sunday, June 29, 2008

One step closer....

Over the past 2 years, I've strived to improve my photography. There was always something about landscape photos that I never got right... I could never produce a landscape photo that had any kind of... feeling it in. Not even gorgeous sunsets or sun rises out in Death Valley... I guess the photos never told a story, there was no connection. People always say you have to "feel" the environment, and love for what you are photographing to produce powerful images. While I certainly enjoyed all the beautiful vistas I've seen... I still wasn't able to quite capture the mood of the scene. This is one reason landscape photography has never been my favorite....
So a few weeks ago I was up in Mountain View for a training course and decided to go out on a photo walk with some friends after work one day. They picked Half Moon bay saying the cloud cover of the coast will provide stunning sunsets, and who can say no to that. I had my doubts as we headed out... the cloud cover looked really thick over the ocean and I figured we wouldn't see much of anything. We made a few quick stops along the way on PCH. I didn't get much out of those stops, a few so so images, but mostly I wasn't feeling very inspired. I did, however, get a nice portrait of myself by one of my friends, an heroic portrait as he calls it.
From Photo Walk at San Gregorio State Beach


We made our final stop at San Gregorio state beach, just south of Half Moon Bay. The sun was quickly descending towards the horizon by this point and we really only had about 10 mins to get ready before the "golden hour". Since both of my companions shoot RAW, I decided to start shooting RAW for some of the photos as well, figured I'd give it another try. Most of my previous RAW photos turned out well, I just didn't have the time (or desire) to do that much post processing to play around with the RAW files. Heck, how often do I get to come to Half Moon Bay to view a potentially stunning sunset? Almost never right... time to bite the bullet and shoot RAW :).

While the sun hasn't quite gotten to the horizon yet, it was behind a thick layer of clouds (but it was perfectly clear overhead) so I figured I'd change the white balance to tungsten or fluorescent to give the clear part of the sky a nice deep blue look. A lot of the beach goers have packed up and started going home when I snapped this shot
From Photo Walk at San Gregorio State Beach


This was shot in RAW so I did a little bit of post on it, making the blue stand out a bit more. I really like the story of this photo... and how lonely it feels. Just a lone silhouette along the beach, walking home. From a more technical perspective, I am not sure if I should have cropped out the log on the bottom. The original photo actually had even more space along the bottom and top and I wanted to crop it a little so its tighter and focus on the silhouette more. I didn't want to cut out the logs because I was worried the composition would become too symmetrical and too boring, but as it stands now, the log is a little distracting so maybe it would be best to cut it out but keep rule of thirds or something. I think I just didn't want to cut out the bottom because I like the color of the water reflection.

From Photo Walk at San Gregorio State Beach


This was also shot in RAW. I set the picture style to "landscape" (Canon thing) and it seemed to really add more punch to the blue. I also manually adjusted the RGB a little and added more contrast. The end result looks very post processed, almost "flickr" like I think. But at the same time, I love the darkness and the texture of the clouds, adds a bit of drama to the photo. The blue feel also makes it feel that much more surreal. I'm usually not much on post processing, but I really like the result for this photo.

From Photo Walk at San Gregorio State Beach


In addition to playing with RAW, I actually gave HDR a try. I've never been a big fan of HDR... almost thought it was "fake"... but it definitely can produce stunning images. At this point, the sunset was just so amazing... the sun was right on the horizon where the clouds were a bit thinner and made the entire horizon bright yellow/orange. The wind swept the clouds towards land creating long beautiful strands. It also thinned the clouds just enough for the sun to light up patches of the sky... the lagoon in front of me was perfectly still forming this beautiful mirror reflecting all the beauty above. It was such a serene and breath-taking view... I just thought what the heck... I have to try HDR now. The dynamic range in the scene wasn't that great, but HDR could certainly help enhance the details in both the sky and the darker reflection. I hope the end result doesn't look too fake... I honestly can't tell anymore since this is all I can remember... in my mind's eye, the sunset really just looked like that and was really THAT stunning and dramatic.

I finally felt like I'm one step closer in the search for the perfect photo... one step closer in taking photos that evoke some kind of emotional response. It is unfortunate that I used HDR to make that step, but it's all part of the learning process. As long as I don't depend on HDR, it should be fine :). The journey is just beginning and I have the rest of my life to explore photography and hopefully find that one shot I can define myself with... that one perfect shot.

Tuesday, June 24, 2008

Photo Club assignment 1

Recently we started a photo club at work, and we decided to start handing out assignments for people to do and then come back together to discuss the photos and just have fun.

The first assignment was for us to take 12 photos of one subject (it must be smaller than a car, but larger than a breadbox). The subject must be stationary and the photographer must be the one moving around. The idea is to get people to explore different views/angles. So often people just approach a subject, snap a shot, and walk away (i.e. getting out of their car at a vista point and snap one shot assuming there is only 1 shot worth taking). Eye level (roughly 5-6 ft) is the most boring perspective and is one you should try to avoid normally (but people are lazy...). Next time you come across a subject to photograph, try above, below (as close to the ground as possible), close, far, something different, you'll be amazed at how refreshing it can be.


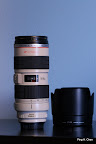
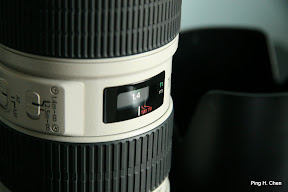
My subject was my favorite (and most expensive....) lens, the Canon EF 70-200 2.8 IS lens. This probably wasn't my first choice in subject, but it worked out none the less. I knew I wanted to get some close up shots of the lens, the writing on it, the different controls, etc (which I did get, but nothing amazing there). I then realized a major flaw in my subject.... it is a cylinder! No matter how I walk around it, it looks practically the same! I had to cheat a little bit and move the lens around and thats when I started having more fun...


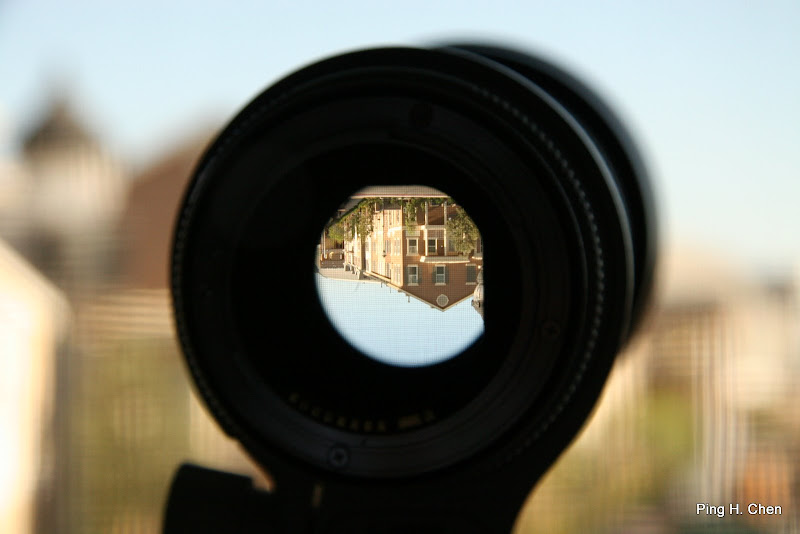
This is probably my favorite shot from the entire set. I had this shot in mind when I first thought of using a lens as my subject but I didn't know how it'd turn out. I was really surprised that you can get it to focus so clearly in the center while blurring everything else around it so its a nice creamy background. The fact that the image was inverted was definitely a pleasant surprise... I had no idea but I guess it makes sense ;). I've only looked through this thing while its on a camera through the view finder, it is definitely a different experience to look through it through another lens :). The window screen also ended up helping the image quite a bit I think. When blurred, it adds a bit of texture and makes the center focused part just look... different. Not quite sure how to explain it :).

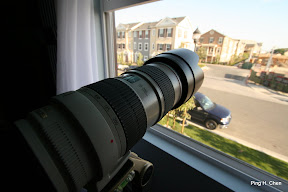
And finally here is the Canon "cannon". I like the distortion effect, making the lens look much bigger than it actually is (well, maybe not "much" :)). I just like the feeling of it pointing outwards... looking over the neighborhood.

Rest of the photos available here: http://picasaweb.google.com/smophotoclub/Pingc1/. I had a lot of fun doing the assignment and thought everyone else's photos turned out really well too. Now I'm excited about assignment two...

Sunday, June 22, 2008

Half of photography is just luck...

Thanks to a friend's suggestion/encouragement, I've decided to start blogging again... this time it'll focus around photos and photography in general... I don't think my photos are good enough to warrant blogging about, but I'll at least try to describe my thought process, places I've been, lessons learned and whatever else I see. If nothing else, it'll document my journey over time as I think I've changed a lot over the past 2 years when I first picked up my SLR. Hopefully I can keep this up longer instead of just forgetting about it :).

I've recently started a photo club at work in Santa Monica. We'll be doing bi-weekly assignments together and hopefully learn from each other. Some people were intimidated by the idea of a photo club thinking it'll be filled with professionals with their big SLRs, and I had to reassure them that equipment does not matter. I've seen some amazing shots taken by simple point and shoots. Personally I believe there are 3 factors that make up a good photograph:

40% is skill of the photographer... this includes basic techniques and understanding how to use your camera.
10% is the equipment... this might be a bit high, but the equipment is really an enabler in some cases, it makes certain shots that much easier to get.

The rest... 50% of it is pure luck. Sometimes, you just have to be at the right place at the right time and let mother nature do the rest.

Looking back at some of the photos I've taken the past 6 months or so... I think the majority of my photos falls in the luck category.

Case in point: This photo is quickly becoming one of my favorite photos. I think it is more or less pure luck... we were on a trip to KenTing (southern most part of Taiwan) when we just decide to pull over at some random run down beach. At the time I knew that you can make some interesting photos with this old fish net so I intentionally tried to include it while my mom avoided it like a plague. But I had no idea how much I'd like the image until after I snapped the first shot and realized I had found something really cool and decided to snap a few more shots, trying harder to compose it but nothing beat the original shot. I've since framed this shot up on my wall now and no matter how many times I look at it, it still fills me with a sense of joy. In the end, it was pure luck that I got this photo... if we had stopped at the beach 30 mins earlier, the light wouldn't have been the same and it just wouldn't have worked... the sky was also perfect in my opinion... a bit ominous with the clouds but still clear enough for the blue to shine through. The golden light of the setting (but not yet set) sun, the empty beach, everything just came together for me.
Of course sometimes it takes a lot of practice to get the shot just the way you want it, I guess that's why people call it painting with light. This is by far the most complex (and maybe the most technically challenging) photo I've ever taken. I'm shooting straight into the sun here which means that the foreground would be completely black if I don't use a flash. I decided to use a wide angle lens to try to exaggerate the size of the cactus and make it stand out even more. Once I got the composition more or less the way I wanted, then came the hard part: balancing ambient light with flash. Thanks to the strobist (http://strobist.blogspot.com) seminar I went to earlier this year, I knew exactly what I had to do. Normally The exposure is affected by both the shutter speed and aperture; but things are a bit different when using a flash. The amount of the flash that gets captured is purely determined by the aperture... the wider the aperture (smaller the F value) the more of the flash you'll capture along with ambient light. This means that you can increase the shutter speed to capture less ambient light without affecting the flash (well... sort of but that's a different story). After a few quick test shots in manual mode, I decided to set the shutter speed to 1/1000th of a second so that I can still get some color in the background but that it is dark enough to not draw attention away from the cactus (apparently I should have paid more attention since that sun is still too bright). At 1/1000th of a second, I had to put my flash into high speed sync mode which meant that it had less power/reach but that was fine. I was only like 2 feet away from the cactus anyways. I didn't want the light from the flash to spill too much on the foreground so I decided to point the flash (on camera flash) away and use a few business cards to act as my mini-reflector. I forget the exact flash setting but the aperture was set at f5.0 so just take a few test shots to determine the right power output for the flash. Overall, I am extremely happy with the shot and the mood that the dark background sets up. If I had to do it again, I'd definitely take the flash off the camera and use a snoot or something to direct the flash better. Oh well :).
And finally, sometimes you DO need the equipment... Having the ability to shoot 5 frames per second meant that I got 5 or 6 shots to pick from... also having a 200mm lens also really helps with the composition :). But I think this is really a rare case. And you can definite still get good action shots with any camera, it is just a bit harder.


I'm a firm believer that the equipment does not make the photographer... you can have thousands of dollars in equipment and still take the crappiest photos (hm....) while someone with a point and shoot can still take award winning photos. As people say, it's the machine behind the camera that matters the most. People might not believe me looking at the gear that I carry around everyday... to be honest a part of me regret the path I've chosen. I definitely don't recommend people to do what I did i.e. buy 4 or 5 lens all within 3 months of buying the SLR as a complete beginner. I wish I had held off and just gone with one kit lens to really learn how to shoot photos... but like most guys... I just like to buy new toys :). In the end, I got lucky and all the lenses I bought 2 years ago I still use religiously today (some more than others) but I've definitely gotten good mileage out of each one and they've enabled me to take shots that I wouldn't have been able to otherwise. In the end, just keep shooting, a lot, and look at your photos to see which ones you liked better and try to figure out why. Digital film is free, just keep shooting, try different angles, low, high, close, far, left, right, and experiment, do something out of the box; the most boring perspective is roughly 5 or 6 ft at eye level. But most importantly, have fun! I know I certainly did the past two years.

Wednesday, September 12, 2007

Taipei 101

So while I was working in the Taipei office, which happens to be located in Taipei 101, I wanted to take off early one day and hike up 象山, a near by mountain that offers an amazing view of Taipei 101 and the entire Taipei Basin. I've seen some AMAZING pictures taken from there (see http://www.pbase.com/albertjou/g20) which is why I'm so interested in going there to try my hand at taking some pictures. All I needed was a nice clear afternoon and a perfect sunset... Unfortunately there was a thunderstorm EVERY afternoon at about 1:30 sharp... and it'd rain until 5:30 or so which unfortunately killed any chance of me going up the mountain. My last chance was on Friday... but the forecast is the same... rain in the afternoon... Lucky for me, it stayed beautiful all afternoon so I left work a bit early, grabbed my gear and found my way up the mountain. Unfortunately the clouds rolled in as I was hiking up (perfectly clear overhead, but cloudy in the west for the sunset). While the sunset itself wasn't amazing, but it wasn't too bad :).

Monday, September 3, 2007

Days before typhoon...

The days before typhoons typically results in the best weather as the clouds are swept away. I didn't want to let this opportunity to slip by so I had a friend of mine take me on a road trip into the mountains to the south of Taipei near Taoyuan... The weather was indeed spectacular with clear blue skies and scatter clouds that were pure white. It was really breath taking views but I found it really difficult to compose a good photograph to do the view justice... All the pictures I took felt flat and didn't evoke any emotions for the viewer... well, take a look:


With such beautiful weather I then dragged my friend to DaDaoCheng (大稻程) for sunset. The sunset started off great and the place was packed with photographers (people just kept coming on their mopeds one after another, each with a nice SLR and some expensive tripod among other equipment...). But as the sun actually fell below the horizon, the storm clouds gathered and soon was drizzling... Originally I really wanted to get to 象山, a popular mountain near Taipei 101 to photograph all of Taipei basin but that was too far out of the way. From pictures that I've seen, it stayed clear and beautiful for the entire sunset there. Oh well.


Finally on the day that typhoon was suppose to make landfall in southern Taiwan, I decided to sneak out in the morning for some quick photograph (really scouting) at the water museum (自來水博物館). It has become a popular place for portrait (especially engagement/wedding photos).